

Vandaag besloot ik het anders te doen dan
anders. Weg met de keurig gemaakte nail arts waarvan geen enkel lijntje schuin
loopt. Ik besloot me te wagen aan de freehand marble techniek. Door natte
nagellak op je nagels te 'swirlen' met een stokje of dottingtool, zou je een
mooi effect moeten bereiken. Na het maken van deze nail art twijfelde ik of ik
hem wel online moest zetten. Is hij wel mooi genoeg voor op mijn blog, is het
geen faler? Ik besloot hem toch te plaatsen, omdat het leuk is om mijn nail art
skills te zien veranderen. Waarom dan niet iets nieuws proberen? Niet geschoten
is altijd mis, zegt men toch? haha In dit artikel zien jullie het eindresultaat
van deze nieuwe nail art.
Today I decided to do something different. I wanted to go for something different than the perfect striped nail arts that I usually make. I decided to start trying the freehand technique marble. By
swirling some wet nail polish on your nails with a little stick or dottingtool, you should
achieve a nice effect and a stunning manicure. After making this nail art, I doubted whether I had to
put it online. Is it good enough for my blog, it is not a failer? I decided to
post it anyway, because it's nice to see some changes in my nail art skills. Why not try
something new? Nothing tried nothing gained, one would say? haha In this
article, you see the end result of these new nail art.

Hierboven kunnen jullie meer foto's van mijn
nagels aanschouwen. Ik besloot zoals in de inleiding al gezegd, het marble
effect op mijn nagels te maken. Dat deed ik door eerst een donker blauwe basis
en een dikke verticale witte lijn op mijn nagels aan te brengen. Ik wachtte
niet tot dit gedroogd was, maar pakte een dottingtool met het dunste puntje
erbij. Vervolgens probeerde ik een patroon in de nagellak te maken. Het
eindresultaat maakte me erg enthousiast! Hoe leuk is dit effect, en hoe simpel
is het om in een paar minuten door middel van natte nagellak en je eigen handen
een nieuwe manicure te maken! De donkerblauwe lak die ik als basis gebruikte is
van Essence en heet No. 22 I love my Blue Jeans. De witte lak is weer mijn alltime favorite van Sinful
Colors genaamd: Snow me White.
Above you can see some more pictures of my nails. I decided as already
mentioned in the introduction, to start making the marble effect on my nails. I did this
by applying first a dark blue base and a thick vertical white line on my nails.
I did not wait until this had dried, but picked up a dottingtool with the thinnest
tip on it. Then I tried to make a pattern on the wet nail polish. The end result
made me very excited! How cute is this effect and how easy it is to make it in just a
few minutes by using wet nail polish and your own hands, in that way you can create a new manicure! The dark blue
paint that I used as the basis is from Essence and is called No. 22 I love my Blue Jeans. The white paint is again
my alltime favorite Sinful Colors called me Snow me White.
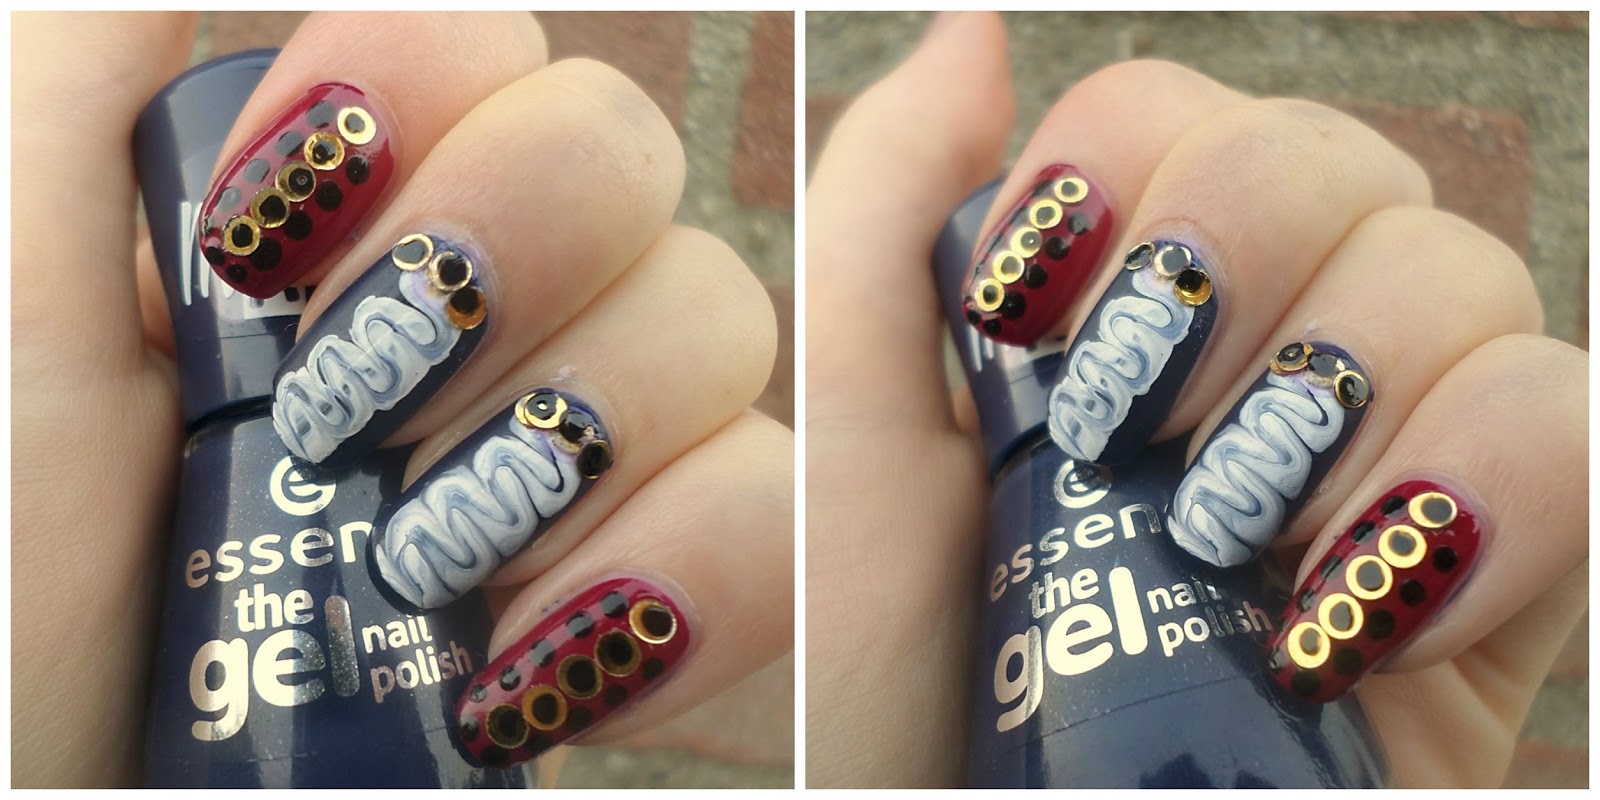
Daarna waren mijn andere twee nagels aan de
beurt. Ik besloot te gaan voor een rode basis. Daarover bracht ik simpele
gouden steentjes aan. Maar dat vond ik niet genoeg. Ik besloot zwarte stippen
aan de steentjes toe te voegen en ook op mijn 'marble' nagels voor dit detail
te gaan. De rode lak die ik gebruikte is van: Essence genaamd: Nr. 10 True Love. De zwarte lak die ik
gebruikte om stippen te zetten heet No. 144 Black is back en is ook van Essence. Ik ben benieuwd wat jullie
van deze techniek vinden. Ik ben van plan in de komende post meer marble
manicures met jullie te delen, als het resultaat een beetje redelijk is tenminste
haha. Bedankt voor het lezen van dit artikel!
After finishing my first two nail it was time for the other two. I decided to go for a red base. I decided to just apply some simple golden
rhinestones on my fingertips. But that wasn't enough for me. I decided to add black dots on the
stones and also on my 'marble' nails to add more of this detail. The red paint that I used
is from: Essence and is called No. 10 True Love. The black paint that I used to put some dots on my nails is also from Essence called: No. 144 Black is Back. I
wonder what you think of this technique. I'm planning on sharing more
marble manicures with you, if the result is at least somewhat reasonable haha. Thanks for reading this article!
Thanks for reading this article on Creativenails4fun!
* Nothing to disclose

This comment has been removed by the author.
ReplyDeleteAmazing! Weer echt een mooie en bijzondere creatie.
ReplyDeletexoxo
www.its-dash.com
AWW dankje Dascha!
Deletex
Heel tof gedaan met dat goud!
ReplyDeleteLeuke techniek maar volgens mij alsnog niet zo makkelijk, ik wil hem zelf ook nog proberen :)
ReplyDeleteSuper gaaf!
ReplyDeletetnx!!
Deletexx
Looks very cool! :)
ReplyDeleteWat een leuke techniek zeg! Heel mooi gedaan!
ReplyDeleteWauw wat prachtig zeg!
ReplyDeleteAWW dankjewel, ben blij dat je deze nieuwe nail art mooi vindt :)
Deletex
Wauw! Hier blijf je naar staren. Hele gave techniek!
ReplyDeletewat een prachtige nail art heb je gemaakt, heel erg apart....
ReplyDeletedankjewel!
Deletex
This is my favorite of your designs
ReplyDeletexx
www.sakuranko.com
Wow that`s amazing! Thank you for these amazing idea. As a rule, I give myself manicure on a weekly basis. Only on a special occasion I can pamper myself and afford a professional manicure at the nail beauty studio .
ReplyDeleteAWW thank you so much :)
Deletevery cute and unique
ReplyDelete--Sony
http://nailscontext.blogspot.com/